Have you ever wanted to just get the complete path to a file and use it in a text editor? I find I do more often these days, particularly when trying to explain to someone where they might find a preference file, for example. I’m sure there used to be the ability to copy the file path to the clipboard in earlier versions of Mac OS, but in OSX it isn’t there.
You can get utilities that add that functionality, of course, but I was playing with Automator again, and thought I’d give it a go. It turns out to be extraordinarily easy!
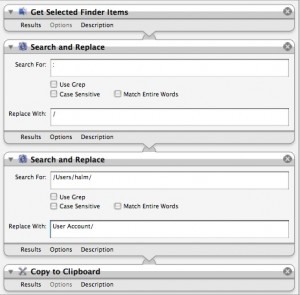
Run Automator, set it to work with FIles and Folders, and add the first of two commands: ‘Get Selected Finder Items’. Now add the second commans from the ‘Utilities’ section: ‘Copy to Clipboard’.
That’s it. Really.
Now go to the ~/Library/Workflows/Applications/Finder folder and put your workflow in there. It will now appear in the contextual menu, under ‘Automator’ for any file or folder you have got. When you click it, wait a moment for a slight ‘flash’ to appear on screen and you know you’ve got the path in your clipboard.
If you need to replace the Unix style separators with a forward slash, or replace the full path to show a ’tilde’ character (as in the example above) then simply add a third command in between the two you’ve just done – use the ‘Text’ tools and run a ‘Search and Replace’ command to find ‘:’ and replace with ‘/’. You might also want to replace ‘Users/accountname/’ with simply ‘~/’ or even ‘User Account/’ or whatever you want. Add another workflow item before the ‘Copy to Clipboard’ command.
Then, pick any file or folder anywhere on your system, control (right) click on it and select ‘More’ at the bottom of the menu, then ‘Automator’ then the name of your workflow. You’ll then be able to paste it into any text document you wish. You can download my workflow file HERE.
You can just drag the file to any text editor or text area and it will output the path directly.
Also, the reverse:
In any file dialogue, press Apple-Shift-G.
This will allow you to ‘Go’ to any folder.
Is that any use?
Thanks Rob!
Dragging the file works well if you hold the command key down at the same time, and don’t mind the path showing your user name – not much of a worry, but I am being incredibly lazy!
Dragging to a text area such as on this blog would also not give you the right path as there is a javascript interception… I haven’t tried it elsewhere yet.
I do not have the “Search and Replace”-Action in my Automator Library. can you post the Automator-File including that Action?
http://www.apple.com/downloads/macosx/automator/texteditautomatoractionpackforleopard.html
You use to be able to just Right Click (Option – Click) on a file and select File path to Clip and it would just copy the file path to the clipboard and then you could just paste the path in any text doc. It was the easiest way to do it. Unfortunately that is no longer a menu item when you Option-Click. Dragging a file into a text doc and then copy and pasting the path is a pain in the ass. I really wish that apple hadn’t removed that little nugget of ease
If you select the file then go to the Finder Tab (at the top of the screen next to the Apple) and drop down to Services then Summerize will show you the path. You can also use Finder>Services>Texedit>New Window Containing Selection will also copy the path into the Texedit window.
Get Filebuddy and you’ll have the option in the finder’s contextual menu:
More > File Buddy > Copy Path
More > File Buddy > Copy HFSPath
Copy Path will give a result that looks like:
/Volumes/Macintosh HD/Directory1/Directory2/Direcory3/etc
Copy HSF Path will give a result that looks like:
Macintosh HD:Directory1:Directory2:Direcory3:etc