Spedr – firefox extension, shortening urls

Up until now I have been a big fan of tinyurl, which takes a really long URL from anywhere and converts it into a short and neat version that can be pasted into a text document or email. This is good because it means the link won’t split over lines and is less likely therefore to appear to be broken.

Where Spedr wins is that it is an extension to Firefox and gives you the exact same functionality in your URL bar by clicking a small ‘lightening bolt’ icon. This saves so much time it’s ridiculous! Tinyurl does provide a link to add to your toolbars in other browsers, which is alright, but takes you to the tinyurl.com page.

If you have not yet seen Spedr, check here:

http://www.spedr.com/firefox

Copy file path to clipboard, Mac OSX

The Automator Workflow

Have you ever wanted to just get the complete path to a file and use it in a  text editor? I find I do more often these days, particularly when trying to explain to someone where they might find a preference file, for example. I’m sure there used to be the ability to copy the file path to the clipboard in earlier versions of Mac OS, but in OSX it isn’t there.

You can get utilities that add that functionality, of course, but I was playing with Automator again, and thought I’d give it a go. It turns out to be extraordinarily easy!

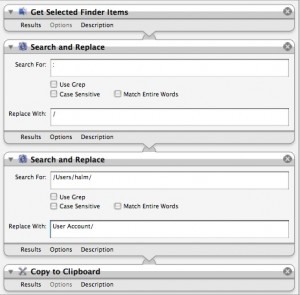
Run Automator, set it to work with FIles and Folders, and add the first of two commands: ‘Get Selected Finder Items’. Now add the second commans from the ‘Utilities’ section: ‘Copy to Clipboard’.

That’s it. Really.

Now go to the ~/Library/Workflows/Applications/Finder folder and put your workflow in there. It will now appear in the contextual menu, under ‘Automator’ for any file or folder you have got. When you click it, wait a moment for a slight ‘flash’ to appear on screen and you know you’ve got the path in your clipboard.

If you need to replace the Unix style separators with a forward slash, or replace the full path to show a ’tilde’ character (as in the example above) then simply add a third command in between the two you’ve just done – use the ‘Text’ tools and run a ‘Search and Replace’ command to find ‘:’ and replace with ‘/’. You might also want to replace ‘Users/accountname/’ with simply ‘~/’ or even ‘User Account/’ or whatever you want. Add another workflow item before the ‘Copy to Clipboard’ command.

Then, pick any file or folder anywhere on your system, control (right) click on it and select ‘More’ at the bottom of the menu, then ‘Automator’ then the name of your workflow. You’ll then be able to paste it into any text document you wish. You can download my workflow file HERE.

Access iPhone Backup, recover files from iPhone backup

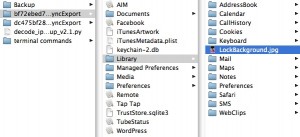
output from python fileIt was bound to happen sooner or later. I took a photo with my phone and used the image as the wallpaper for when the phone is locked. However, I completely overlooked this when I deleted the original image from the camera roll. This meant I had an image in place but no way of accessing it, and I quite liked the image!

It turns out that when you connect your iPhone to your Mac and iTunes starts, it runs a backup and places some files in your ‘~Library/Applications Support/MobileSync/Backup folder. The problem is that they are SQLLite files and not easily readable in any simple way. This is where I turn to the Apple community, particularly the discussions, and ask for help. Here is the post I made.

I was so pleased with the response – almost immediate and ultimately one of the most helpful. It appears there is a Python script able to open those files and restore the folder structure from the innards of your phone. The thread answers the questions most folk will have, but I thought I’d post here too.

What you need to do is copy the backup folder and all it’s contents to an easily accessible place – I chose a new folder on my desktop. Copy the Python script into the same folder. You then need to change the permissions on that script to ensure that it is executable. You should do this through the terminal, which means you’ll probably need to use ‘sudo’ and ‘chown’ to set the values correctly. Once you have done this you can run the script. You do this by typing ‘sudo’, then the complete path to the script, a forward slash, then the complete path to the folder (you can simply drag the items into the terminal window to do this and the paths will be filled in automatically for you). Finish with a forward slash and then ‘*.mdbackup’.

What this will do is reconstruct the entire iPhone folder structure inside the place you have got the python script and backup folder. Once done you can then set the permissions for the resulting foder and copy to all items inside… you can then access and manipulate the files.

This was, in fact, ludicrously easy – I had help from a former colleague who is something of a star with this stuff, but if you know a few basic commands in the terminal you should be OK.

I’ve also uploaded the Python script for you all to download from here in case it goes offline elsewhere. The original is HERE. The one I used (and changed ownership on) is HERE.
Upgrading iPhone to 3G, Restoring iPhone, Backup iPhone

What nobody seems to mention when you upgrade your iPhone to the 3G version is that you have to back up and restore your phones in a particular way. The issue arises when you have got a 3G iPhone that has an older firmware version on it and when you have iTunes set to automatically sync your device.

Backup of the old phone is simple – you plug in to your computer and iTunes creates a backup. This is not a problem, and you then go about changing the SIM card to the new phone and pugging that one in to iTunes. It is recognised as a new phone and so you go through the process of setting it up, however you find that it has an older firmware version than your previous phone. SO you go to ‘Restore’ and it tells you that you can’t – that you need to upgrade the firmware first. That’s OK, you think – you can restore later.

However, you *must* remember to turn OFF the auto syncing from in your iTunes preferences (under ‘Sync’). Otherwise the new firmware will be installed and the new phone will have new settings in place.

Turning off the auto syncing allows you to then choose the ‘Restore’ option you want.

If you don’t remember to do this the chances are that you’ll have a new iPhone with none of the photographs, wallpapers or other files on it. If this happens don’t panic – go into iTunes and turn off the auto sync, then restore the phone (removing all the new stuff iTunes has just loaded) and *then* you can use the restore feature.

Works a treat… eventually! If only the set up allowed for this and an appropriate warning was put on screen… it would have saved me 40 minutes!

Cleveratom Website

cleveratom website
cleveratom website

The Cleveratom website has been given a new look and a new engine, too! For the last few months we have been relying on WordPress to drive things along, and whilst it has been OK, it has never been what we wanted. It was better than a static page, but never really did the job we needed. Fortunately, that has all changed today as we moved over to the rather brilliant ‘CMS Made Simple‘ content management system.

If you head over to www.cleveratom.co.uk you will see the new livery and be able to read all about the work that we are doing. There are many things still to add in relating to the projects we are doing, and you can always sign up to the newsletter in order to get more information on a (fairly) regular basis!

Getting a new site up and running is always traumatic in some way, and today we did battle with DNS servers, Nameservers and email records. Sheesh! No doubt we are all the better for the experience!